
Java 5 introduced a new tool that completely changed how Java development looks: annotation processing. Many important Java libraries rely on annotation processing, including Spring, Hibernate, Room, Dagger, and many more. One could even say that annotation processing is essential for modern Java development and, as a result, also Kotlin/JVM development. Regardless of this, most Java and Kotlin/JVM developers don’t understand how it works. This is perfectly fine as a driver doesn’t need to understand how a car works, but understanding annotation processing can help us debug libraries, develop them, or implement our own tools. So, this chapter will explain how annotation processing works and show how a custom annotation processor can be implemented.
Before we start, I need to warn you that annotation processing only works for Kotlin/JVM as it still needs javac and cannot be used for other targets (Kotlin/JS or Kotlin/Native). Additionally, javac Annotation processing is costly, so Kotlin decided it needed its own annotation processor. As a result, Google introduced Kotlin Symbol Processing (KSP), which is a direct successor of annotation processing. We will discuss KSP in the next chapter, and the current chapter can be treated as an introduction or prerequisite to fully understanding KSP.
The idea behind annotation processing is quite simple: we define classes called processors that analyze our source code and generate additional files that typically also include code; however, these processors themselves don’t modify existing code. As an example, I will implement a simple library based on the idea of a friend of mine. I’ve never used it in any project, but it is simple enough to serve as a great example. To understand the idea, let's see the problem first. For many classes, we define interfaces primarily to make it easier to define fake variants of these classes for unit testing. Consider the
MongoUserRepository below, which implements the UserRepository interface with a fake FakeUserRepository for unit tests.interface UserRepository { fun findUser(userId: String): User? fun findUsers(): List<User> fun updateUser(user: User) fun insertUser(user: User) } class MongoUserRepository : UserRepository { override fun findUser(userId: String): User? = TODO() override fun findUsers(): List<User> = TODO() override fun updateUser(user: User) { TODO() } override fun insertUser(user: User) { TODO() } } class FakeUserRepository : UserRepository { private var users = listOf<User>() override fun findUser(userId: String): User? = users.find { it.id == userId } override fun findUsers(): List<User> = users override fun updateUser(user: User) { val oldUsers = users.filter { it.id == user.id } users = users - oldUsers + user } override fun insertUser(user: User) { users = users + user } }
The form of
UserRepository is determined by the methods that we want to expose by MongoUserRepository; therefore, this class and interface often change together, so it might be simpler for UserRepository to be automatically generated based on public methods in MongoUserRepository1. We can do this using annotation processing.@GenerateInterface("UserRepository") class MongoUserRepository : UserRepository { override fun findUser(userId: String): User? = TODO() override fun findUsers(): List<User> = TODO() override fun updateUser(user: User) { TODO() } override fun insertUser(user: User) { TODO() } } class FakeUserRepository : UserRepository { private var users = listOf<User>() override fun findUser(userId: String): User? = users.find { it.id == userId } override fun findUsers(): List<User> = users override fun updateUser(user: User) { val oldUsers = users.filter { it.id == user.id } users = users - oldUsers + user } override fun insertUser(user: User) { users = users + user } }
The complete project can be found on GitHub under the name MarcinMoskala/generateinterface-ap.
For this, we need two things:
- Definition of the
GenerateInterfaceannotation. - Definition of the processor that generates the appropriate interfaces based on annotations.
The processor needs to be defined in a separate module because its code is not added to our source code and shipped to production; instead, it is used during compilation. An annotation is just a simple declaration and needs to be accessible in both your project and the annotation processor, so it also needs to be located in a separate module. This is why I will define two additional modules:
generateinterface-annotations- which is just a regular module that includesGenerateInterface.generateinterface-processor- where I will define my annotation processor.
For our own convenience, I will use Kotlin in both these modules, but they could also be implemented in any other JVM language, like Java or Groovy.
We need to use these modules in our main module configuration2. The module that contains your annotation should be attached like any other dependency. To use annotation processing in Kotlin, we should use the
kapt plugin3. Assuming we use Gradle4 in our project, this is how we might define our main module dependency in newly created modules.// build.gradle.kts
plugins {
kotlin("kapt") version "<your_kotlin_version>"
}
dependencies {
implementation(project(":generateinterface-annotations"))
kapt(project(":generateinterface-processor"))
// ...
}
If we distribute our solution as a library, we need to publish both the annotations and the processor as separate packages.
All we need in the
generateinterface-annotations module is a simple file with the following annotation:package academy.kt import kotlin.annotation.AnnotationTarget.CLASS @Target(CLASS) annotation class GenerateInterface(val name: String)
In the
generateinterface-processor module, we need to specify the annotation processor. All annotation processors must extend the AbstractProcessor class.package academy.kt class GenerateInterfaceProcessor : AbstractProcessor() { // ... }
There must also be a document that specifies that this class will be used as an annotation processor. We must create a file named
javax.annotation.processing.Processor under the path src/main/resources/META-INF/services. Inside this file, you need to specify the processor using a fully qualified name:academy.kt.GenerateInterfaceProcessor
Alternatively, one might use the Google AutoService library and just annotate the processor with@AutoService(Processor::class.java).
Inside our processor, we should override the following methods:
getSupportedAnnotationTypes- specifies a set of annotations our processor responds to. Should returnSet<String>, where each value is a fully qualified annotation name (qualifiedNameproperty). If this set includes"*", it means that the processor is interested in all annotations.getSupportedSourceVersion- specifies the latest Java source version this processor supports. To support the latest possible version, useSourceVersion.latestSupported().process- this is where our processing and code generation will be implemented. It receives as an argument a set of annotations that are chosen based ongetSupportedAnnotationTypes. It also receives a reference toRoundEnvironment, which lets us analyze the source code of the project where the processor is running. In every round, the compiler looks for more annotated elements that could have been generated by a previous round until there are no more inputs. It returns aBooleanthat determines if the annotations from the argument should be considered claimed by this processor. So, if we returntrue, other processors will not receive these annotations. Since we operate on custom annotations, we will returntrue. In our case, we will only need theRoundEnvironmentreference, and I will make a separate method,generateInterfaces, which will generate interfaces.
class GenerateInterfaceProcessor : AbstractProcessor() {

    override fun getSupportedAnnotationTypes(): Set<String> =
        setOf(GenerateInterface::class.qualifiedName!!)

    override fun getSupportedSourceVersion(): SourceVersion =
        SourceVersion.latestSupported()

    override fun process(
        annotations: Set<TypeElement>,
        roundEnv: RoundEnvironment
    ): Boolean {
        generateInterfaces(roundEnv)
        return true
    }

    private fun generateInterfaces(roundEnv: RoundEnvironment) {
        // ...
    }
}
Note that when we implement our annotation processor, we don’t have access to typical class or function references from the project where the processor is running. To have these references, the project needs to be compiled, and our processor runs before the compilation phase. The annotation processor operates on a separate type hierarchy that represents declared code elements and has some essential limitations. The annotation processor has the capability to introspect the types of your code but it cannot actually run functions or instantiate classes.
So, now let's focus on the
generateInterfaces method implementation. We first need to find all the elements that are annotated with GenerateInterface. For that, we can use getElementsAnnotatedWith from RoundEnvironment, which should produce a set of element references of type Element. Since our annotation can only be used for classes (this is specified using the Target meta-annotation), we can expect that all these elements are of type TypeElement. To safely cast our set, I will use the filterIsInstance method; then, we can iterate over the result using the forEach method.private fun generateInterfaces(roundEnv: RoundEnvironment) { roundEnv .getElementsAnnotatedWith(GenerateInterface::class.java) .filterIsInstance<TypeElement>() .forEach(::generateInterface) } private fun generateInterface(annotatedClass: TypeElement) { // ... }
Now, for each annotated element, we should generate an interface in the
generateInterface function. I will start by finding the expected interface name, which should be specified in the annotation. We can get the annotation reference by finding it in the annotatedClass parameter, and then we can use this value to read the annotated class name. All annotation properties must be static, therefore they are exposed in annotation references on annotation processors.val interfaceName = annotatedClass .getAnnotation(GenerateInterface::class.java) .name
We also need to establish the package in which our interface should be located. I decided to just use the same package as the package of the annotated class. To find this package, we can use the
getPackageOf method from elementUtils from processingEnv of our AbstractProcessor.val interfacePackage = processingEnv .elementUtils .getPackageOf(annotatedClass) .qualifiedName .toString()
Finally, we need to find the public methods from our annotated class. For that, we will use the
enclosedElements property to get all the enclosed elements and find those that are methods and have the public modifier. All methods should implement the ExecutableElement interface; so, to safely cast our elements we can use the filterIsInstance again.val publicMethods = annotatedClass.enclosedElements .filter { it.kind == ElementKind.METHOD } .filter { Modifier.PUBLIC in it.modifiers } .filterIsInstance<ExecutableElement>()
Based on these values, I will build a file representation for our interface, and I will use the
processingEnv.filer property to actually write a file. There are a number of libraries that can help us construct a file, but I decided to use JavaPoet (created and open-sourced by Square), which is both popular and simple to use. I extracted the method buildInterfaceFile to a Java file and used writeTo on its result to write the file.private fun generateInterface(annotatedClass: TypeElement) { val interfaceName = annotatedClass .getAnnotation(GenerateInterface::class.java) .name val interfacePackage = processingEnv .elementUtils .getPackageOf(annotatedClass) .qualifiedName .toString() val publicMethods = annotatedClass.enclosedElements .filter { it.kind == ElementKind.METHOD } .filter { Modifier.PUBLIC in it.modifiers } .filterIsInstance<ExecutableElement>() buildInterfaceFile( interfacePackage, interfaceName, publicMethods ).writeTo(processingEnv.filer) }
Note that you can also use a library like KotlinPoet and generate a Kotlin file instead of a Java file. I decided to generate a Java file for two reasons:
- If we generate a Kotlin file, such a processor can only be used in projects using Kotlin/JVM5. When we generate Java files, such processors can be used on Kotlin/JVM as well as by Java, Scala, Groovy, etc6.
- Java element references are not always suitable for Kotlin code generation. For instance, Java
java.lang.Stringtranslates to Kotlinkotlin.String. If we rely on Java references, we will usejava.lang.Stringfor parameters in generated Kotlin code, which might not work correctly. Such problems can be overcome, but let’s keep our example simple.
So, let's start building our elements. JavaPoet is based on the builder pattern that we need to use to construct elements on all levels. We will first build the file with the package and the built interface.
private fun buildInterfaceFile(
    interfacePackage: String,
    interfaceName: String,
    publicMethods: List<ExecutableElement>
): JavaFile = JavaFile.builder(
    interfacePackage,
    buildInterface(interfaceName, publicMethods)
).build()
To build the interface, we need to specify the name and then the build methods.
private fun buildInterface(
    interfaceName: String,
    publicMethods: List<ExecutableElement>
): TypeSpec = TypeSpec
    .interfaceBuilder(interfaceName)
    .addMethods(publicMethods.map(::buildInterfaceMethod))
    .build()
To build a method, we need to specify a name based on a method reference, use the same modifiers plus
abstract, and add the same parameters (with the same annotations and the same result types). Note that we can find the annotationMirrors property in ExecutableElement, and it can be transformed to AnnotationSpec using the static get method.private fun buildInterfaceMethod( method: ExecutableElement ): MethodSpec = MethodSpec .methodBuilder(method.simpleName.toString()) .addModifiers(method.modifiers) .addModifiers(Modifier.ABSTRACT) .addParameters( method.parameters.map(::buildInterfaceMethodParameter) ) .addAnnotations( method.annotationMirrors.map(AnnotationSpec::get) ) .returns(method.returnType.toTypeSpec()) .build()
Inside this method, I used two helpful extension functions,
toTypeSpec and getAnnotationSpecs, which I defined outside our processor class:private fun TypeMirror.toTypeSpec() = TypeName.get(this) .annotated(this.getAnnotationSpecs()) private fun AnnotatedConstruct.getAnnotationSpecs() = annotationMirrors.map(AnnotationSpec::get)
To build method parameters, I start from a parameter reference whose type is
VariableElement. I use it to make type specs and to find out the parameter names. I also use the same annotations as used for this parameter.private fun buildInterfaceMethodParameter( variableElement: VariableElement ): ParameterSpec = ParameterSpec .builder( variableElement.asType().toTypeSpec(), variableElement.simpleName.toString() ) .addAnnotations(variableElement.getAnnotationSpecs()) .build()
That is all we need. If you build your main module again, the code using the
GenerateInterface annotation should compile.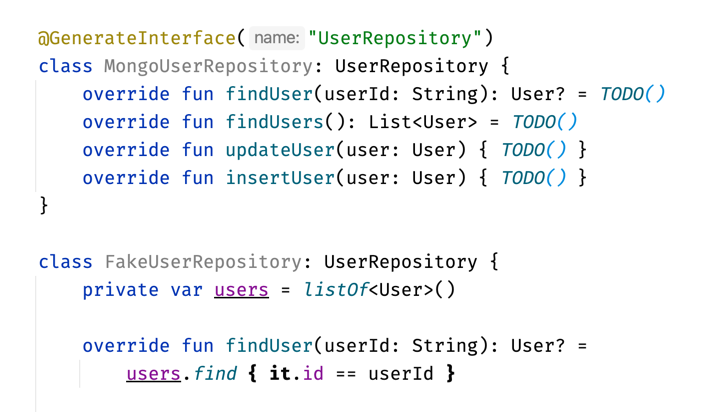
You can also jump to the implementation of
UserRepository and see the Java code that our processor generated. The default location of generated code is "build/generated/source/kapt/main". Intellij's Gradle plugin will mark this location as a source code folder, thus making it navigable in IDEA.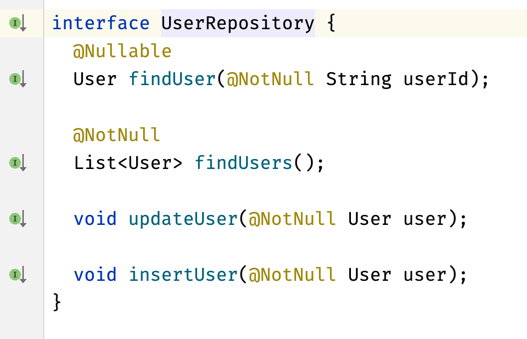
Note that for our
UserRepository to work, the project needs to be built. In a newly opened project, or immediately after adding the GenerateInterface annotation, the interface will not yet have been generated and our code will look like it is not correct.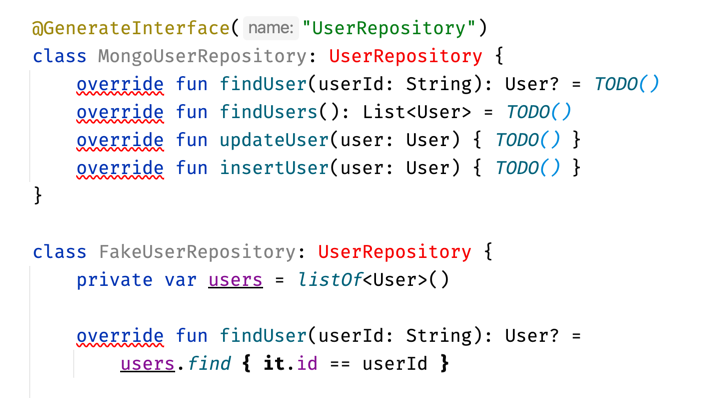
This is a significant inconvenience, but many libraries overcome it by hiding generated classes behind reflection. For example, a popular Mocking library, Mockito, uses annotation processing to create and inject mocks. For that, we use annotations like
Mock and InjectMocks in test suites. Based on these annotations, the Mockito annotation processor generates a file that has a method that creates desired mocks and objects with injected mocks. To make it work, we need to call this method before each test by using Mockito’s static initMocks method, which finds the appropriate generated class that injects mocks and calls its method. We do not even need to know what this class is called, and our project does not show any errors even before it is built.class MockitoInjectMocksExamples { @Mock lateinit var emailService: EmailService @Mock lateinit var smsService: SMSService @InjectMocks lateinit var notificationSender: NotificationSender @BeforeEach fun setup() { MockitoAnnotations.initMocks(this) } // ... }
Some other frameworks, like Spring, use a simpler approach. Spring generates a complete backend application based on the annotated elements defined by developers using this framework to define how this application should behave. When we use Spring, we don’t need to call generated code because it calls the definitions we’ve made. We only need to specify our application such that it uses a Spring class to start this application.
@RestController
class WelcomeResource {

    @Value("\${welcome.message}")
    private lateinit var welcomeMessage: String

    @Autowired
    private lateinit var configuration: BasicConfiguration

    @GetMapping("/welcome")
    fun retrieveWelcomeMessage(): String = welcomeMessage

    @RequestMapping("/dynamic-configuration")
    fun dynamicConfiguration(): Map<String, Any?> = mapOf(
        "message" to configuration.message,
        "number" to configuration.number,
        "key" to configuration.isValue,
    )
}
We can also define our custom entry point. In such cases, we also use reflection to run generated classes.
@SpringBootApplication
open class MyApp {
    companion object {
        @JvmStatic
        fun main(args: Array<String>) {
            SpringApplication.run(MyApp::class.java, *args)
        }
    }
}
The process of hiding generated classes behind functions that reference them with reflection is very popular and is used in numerous libraries.
Annotation processing is a really powerful JVM tool that is used by many Java libraries. It generates files based on annotations used by library users. The idea behind annotation processing is relatively simple, but implementing it might be challenging as we need to operate on element references and implement code generation. Generated elements are only accessible once the processed project is built, which is an inconvenience to annotation processor users. This is why many libraries provide an API with functions that use reflection to reference generated classes at runtime.
From Kotlin's perspective, the biggest Annotation processing limitation is that it works only on Kotlin/JVM, therefore we can’t use it on other Kotlin flavors or on multiplatform modules. To get around this, Google created an alternative called Kotlin Symbol Processor.
- This idea goes against the practices we use in modern JVM development. Interfaces that define repositories (ports) are typically part of the domain layer, where their implementations are part of the data layer. What’s more, at least in theory, we should define our repositories based on the abstraction we’ve specified by interfaces, not the other way around. That is why the usefulness of this annotation processor is very limited. Nevertheless, it will serve as a good example. ↩
- By "main module" I mean the module that will use annotation processing. ↩
- As its documentation specifies, kapt is in maintenance mode, which means its creators are keeping it up-to-date with recent Kotlin and Java releases but have no plans to implement new features. ↩
- IDEA's built-in compiler does not directly support kapt and annotation processing. ↩
- In this project, the Kotlin compiler must be used in the project build process. ↩
- In this project, the Java compiler must be used in the project build process. ↩


