

After numerous problems that developers had with Nav 2, we finally have a stable and well-designed library, which additionally gives us much stronger ownership of the backstack, more flexible navigation, strong support for multiplatform, and the ease to support different screen sizes and configurations. Welcome Nav3, hopefully the ultimate Compose navigation library.
This guide focuses on migrating from Nav2 to Nav3 and walks you through the steps you need to take to migrate your current navigation setup to Nav3.
The first thing you’ll need to be able to migrate to Nav3 is to include its dependencies. It is advisable to keep the dependencies of the old navigation until the entire migration is complete. That way, you can do the migration gradually, part-by-part, rather than all at once.
So, the first thing you need to do is put the Nav3 dependencies into your dependency management file/version catalog:
androidx-navigation3-runtime = { module = "androidx.navigation3:navigation3-runtime", version.ref = "navigation3Version"}
androidx-navigation3-ui = { module = "androidx.navigation3:navigation3-ui", version.ref = "navigation3Version"}
Once you apply these dependencies, make sure you sync the project.
Now that the Nav3 is available, we can start using its APIs in our code. The next step we need to do is update our existing navigation keys/destinations. This guide assumes you already use typesafe destinations. If that’s not the case, you can do both migrations at once, but it will be safer and easier if you first migrate your routes to typesafe destinations and then continue with this migration. Once you have typesafe destinations in place, you need to mark them as NavKey by letting them extend from the NavKey interface coming into the Navigation 3 library.
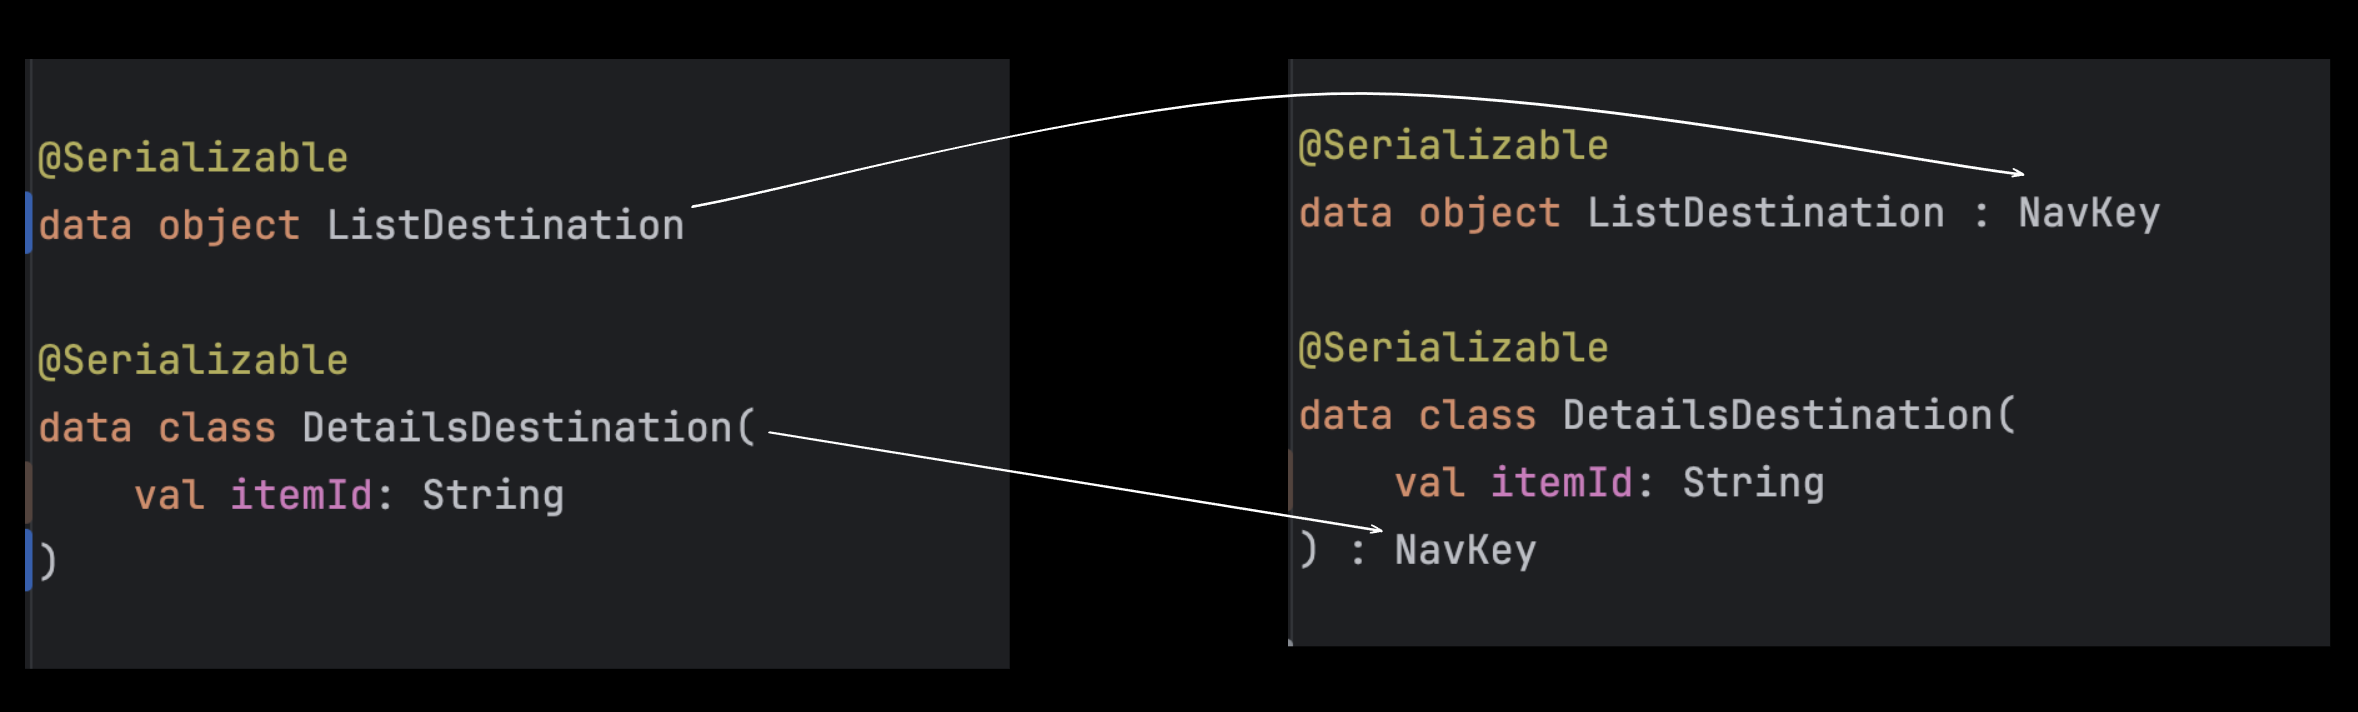
NavKey is a marker interface that makes working with Nav3 destinations easier, because the APIs inside the Nav3 that are responsible for storing and restoring state are relying on it. We are not obligated to use it, though, but then we will have to take care of the state storage and restoration on our own.
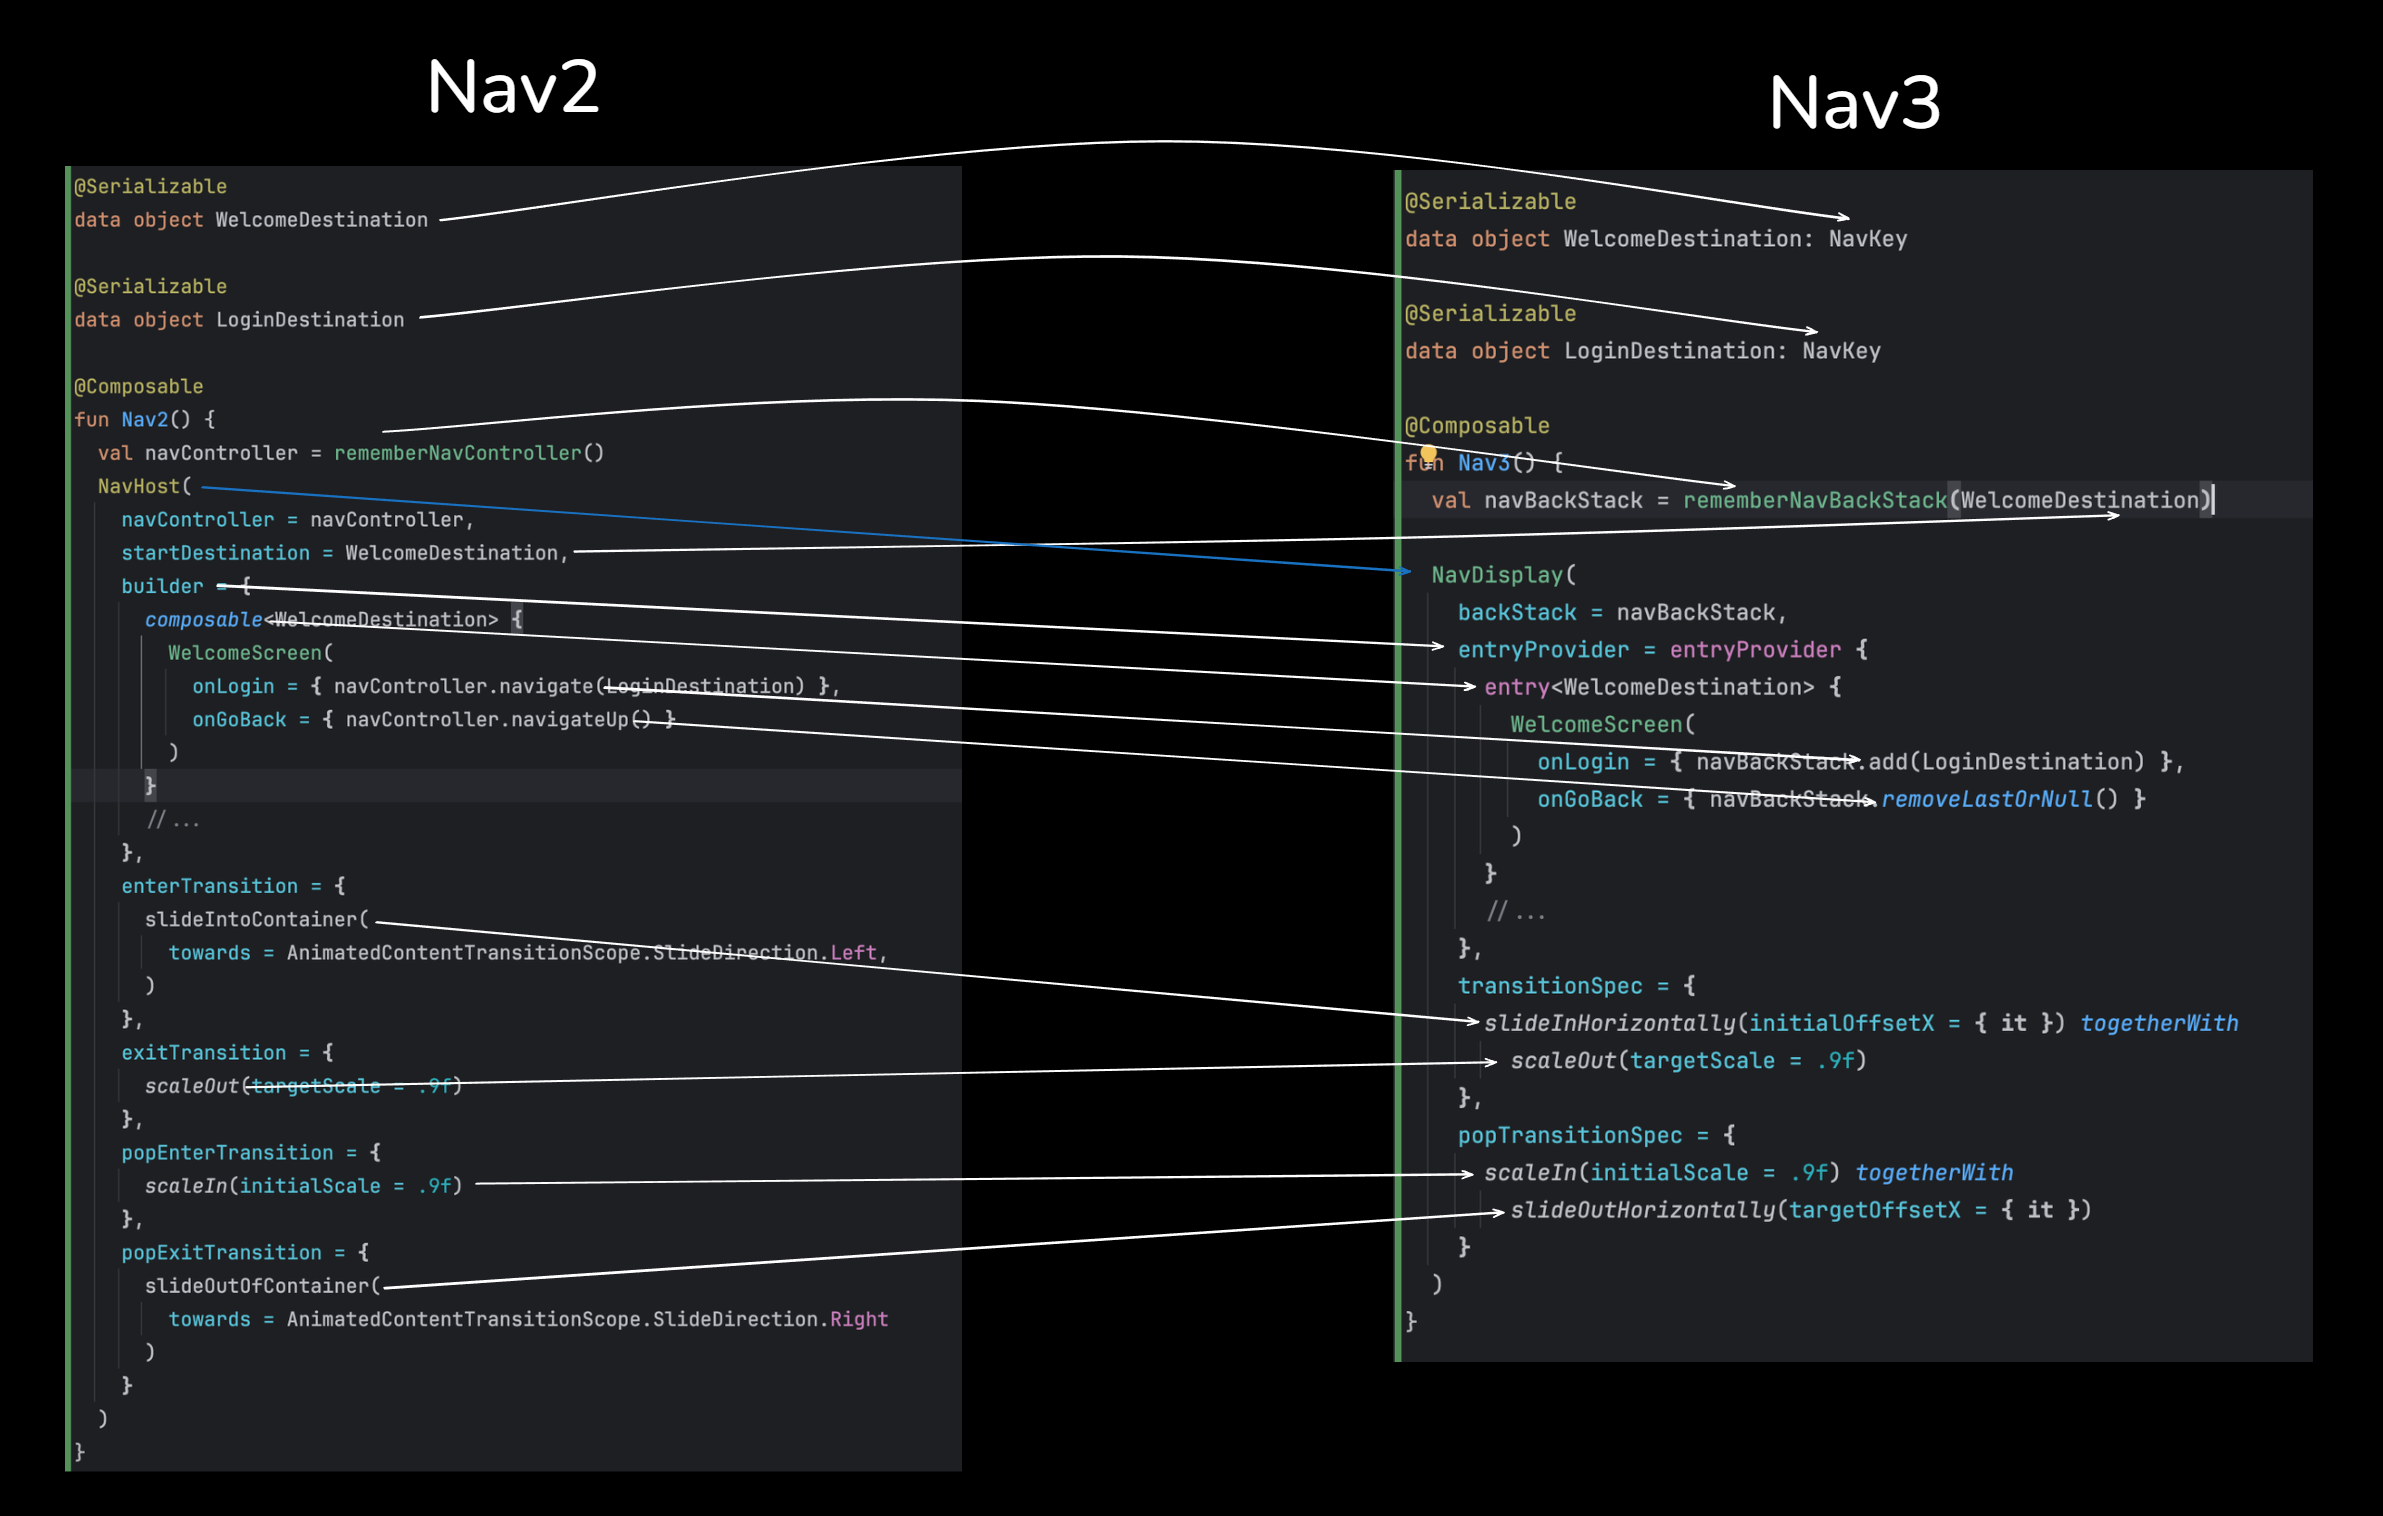
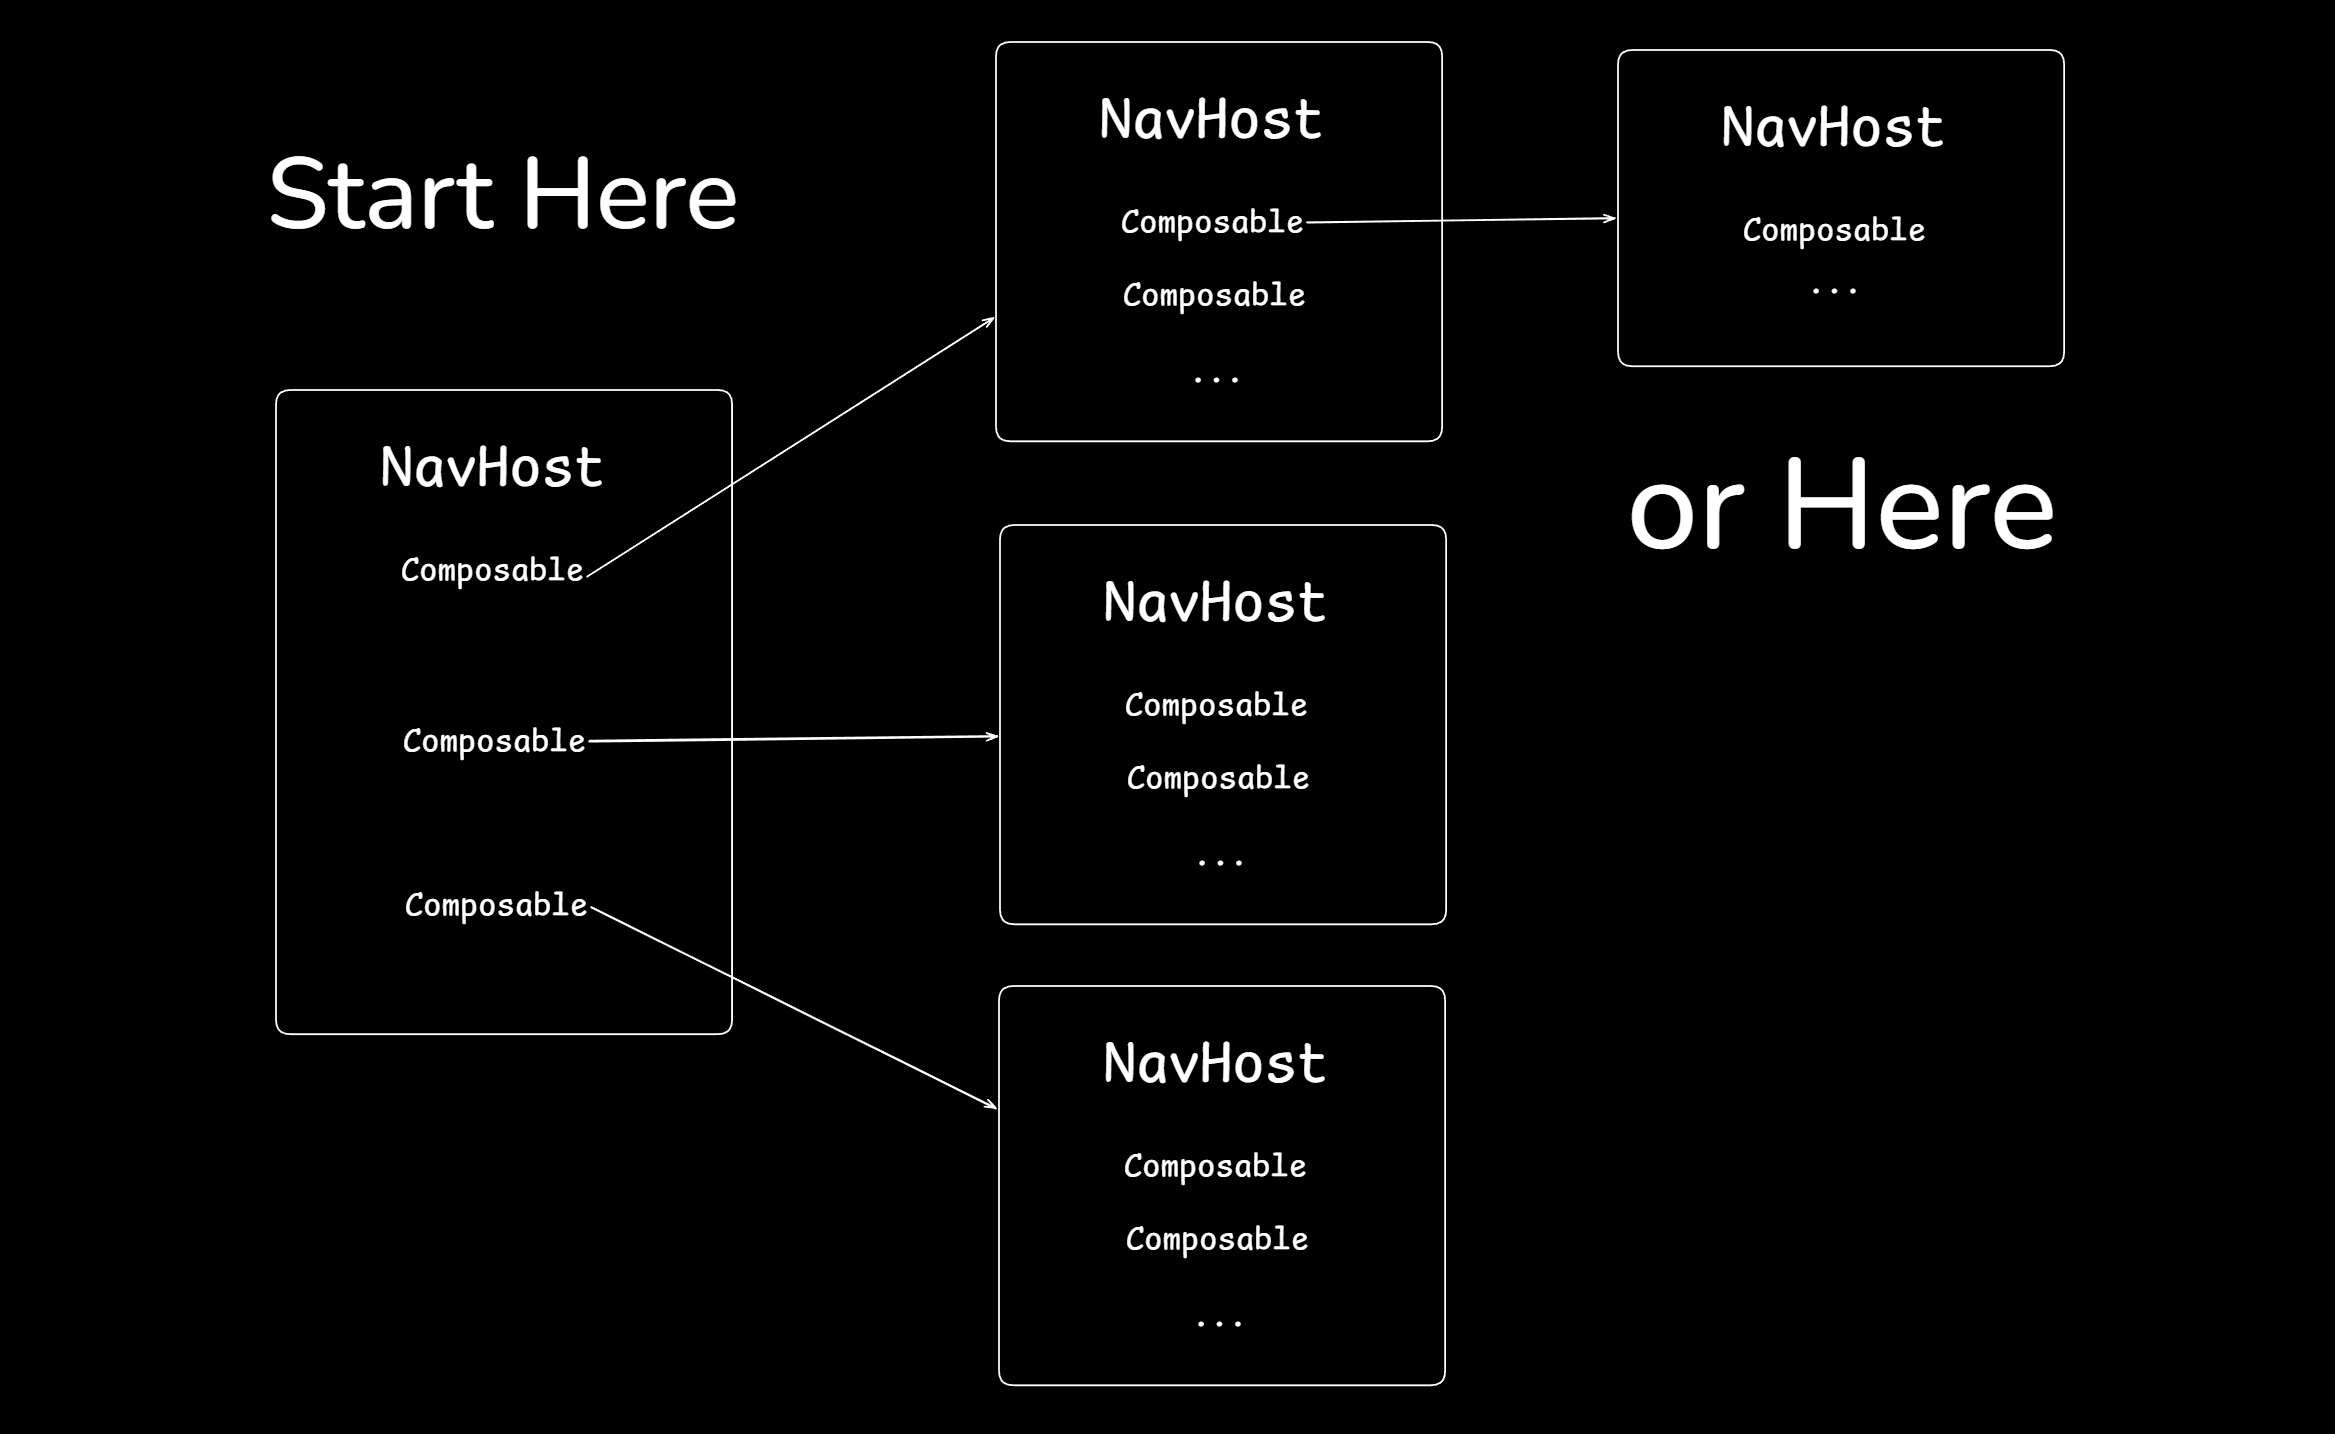
At this point we are ready to start with the migration. Given that we only added dependencies and marked our routes/destinations with NavKey, we didn’t change much. Our existing navigation will remain working. We can proceed by migrating the navigation NavHost-by-NavHost on our own will. We don’t need to migrate everything at once. If your current setup happens to have a single NavHost, you only need to migrate that one. If you happen to have more, a good strategy would be to start either from the very root one, or from the ones at the edges. Of course, this is only advice, and it will help you with keeping track of things.
Once you choose a NavHost you are going to start the migration from, you might have something similar to this:
val navController = rememberNavController()


NavHost(
   navController = navController,
   startDestination = ListDestination,
   builder = {
       composable<ListDestination> {
           ListScreen(...)
       }
       composable<DetailsDestination> {
           DetailsScreen(...)
       }
   }
)
We can start off by replacing the NavHost with a NavDisplay. But to be able to do it, it is a good idea to first replace the nav controller with a navigation back stack. Find the call to remember the nav controller and replace it with
rememberNavBackStack:// This val navController = rememberNavController() // Replace with this val navBackStack = rememberNavBackStack()
Next, replace the call to the
NavHost to NavDisplay, even though things aren’t compiling. At that point, you would experience more compilation errors, and that’s fine. We are going to replace the parameters we are passing to the NavDisplay one by one.First, the NavDisplay does not take the
navController parameter. Instead, it takes a back stack which is a List<T> type.val navBackStack = rememberNavBackStack() NavDisplay( backStack = navBackStack, startDestination = ListDestination, builder = { composable<ListDestination> { ListScreen(...) } composable<DetailsDestination> { DetailsScreen(...) } } )
Next, let’s look into the start destination. The NavHost used to take in a
startDestination parameter set to ListDestination. We need to move this parameter to the nav backstack. One of the biggest advantages in Nav3 is that we completely own the backstack, so we can manipulate it any way we want. In that sense, as an initial destination to the backstack, we can set the same destination we used to have as a start destination in the NavHost.val navBackStack = rememberNavBackStack(ListDestination) NavDisplay( backStack = navBackStack, builder = { composable<ListDestination> { ListScreen(...) } composable<DetailsDestination> { DetailsScreen(...) } } )
Finally, we need to replace the builder. Instead of a nav graph builder, the NavDisplay takes in an entryProvider parameter. The entry provider is similar to the builder in the sense that it defines the destinations the NavDisplay can navigate to as entries. The advantage of Nav3, though, is that we can render more than 1 entry simultaneously, depending on the NavDisplay configuration. But that topic is out of the scope of this migration guide. For now, we need to replace the
builder with an entryProvider, and we need to replace the composable functions with entry functions.val navBackStack = rememberNavBackStack(ListDestination) NavDisplay( backStack = navBackStack, entryProvider = entryProvider { entry<ListDestination> { ListScreen(...) } entry<DetailsDestination> { DetailsScreen(...) } } )
As we established, in Nav3, we completely own the backstack, and we can manipulate it on our own. On top of that, the backstack is a simple List<T> that we can add and remove items from. When we add an item to it, the entry with that same type is going to be rendered, effectively navigating to it. The item we have added is going to be the last item in the list. Therefore, the last item is the current entry that the NavDisplay is rendering. By removing an item from the backstack, we are navigating back. When there are no more items in the backstack, the composable exits the composition.
Back to the migration, we need to replace the calls for the
Back to the migration, we need to replace the calls for the
navController to navigate and navigateUp into calls to the backStack to add and remove items:// Replace this entry<ListDestination> { ListScreen( items = allItems, onItemSelected = { itemId -> navBackStack.navigate(DetailsDestination(itemId)) } ) } entry<DetailsDestination> { val args = it.toRoute<DetailsDestination>() DetailsScreen( itemId = args.itemId, onNavigateBack = { navBackStack.navigateUp() } ) } // With this entry<ListDestination> { ListScreen( items = allItems, onItemSelected = { itemId -> navBackStack.add(DetailsDestination(itemId)) } ) } entry<DetailsDestination> { backstackEntry -> val args = backstackEntry.toRoute<DetailsDestination>() DetailsScreen( itemId = args.itemId, onNavigateBack = { navBackStack.removeLastOrNull() } ) }
The last thing that doesn’t compile is reading the arguments being passed to the
DetailsDestination. In the previous setup with the NavHost, the way to read the arguments passed to a specific destination was to call the toRoute<T>() function on the backstack entry passed in the composable function lambda. With the Nav3, we have the instance of the destination itself, inside the entry lambda block. So we can read the arguments directly.entry<DetailsDestination> { detailsDestination -> DetailsScreen( itemId = detailsDestination.itemId, onNavigateBack = { navBackStack.removeLastOrNull() } ) }
Transitions
It may happen that you have some custom transitions when navigating between the screens. In the case of the NavHost, there are 4 parameters that we need to pass to it to create nice-looking transitions between the screens:
enterTransition = {},
exitTransition = {},
popEnterTransition = {},
popExitTransition = {}
Here, the
enterTransition defines the animation that will run on the new screen that enters the container. The exitTransition defines the animation that runs on the screen that exits the container. popEnterTransition defines the animation that runs for the screen that enters the container, but this time, when navigating back to it. popExitTransition defines the animation that runs on the screen that exits the container when navigating back. This API is super confusing, and as you can notice, it takes extra effort to understand and visualize what’s going on. Nav3 has simplified it significantly. There are only 2 parameters that we need to define, and we combine the enter + exit inside them.transitionSpec = { slideInHorizontally() togetherWith scaleOut() }, popTransitionSpec = { scaleIn() togetherWith slideOutHorizontally() }
Here, inside the transitionSpec we define the transitions that run when navigating forward. The first transition has to be an
EnterTransition and it will run on the screen that comes to the container. Then we call an infix extension function togetherWith on it to specify the ExitTransition that runs on the screen that goes away from the container. Inside the popTransitionSpec we define the transitions that run when navigating back. Again, we start by defining the transition that runs on the screen that enters the container, followed by the transition that runs on the screen that exits the container.So far, we made a successful migration of the navigation of a single
NavHost, and all we need to do is repeat the process for the rest of the NavHosts. The good thing is that we can do this gradually on our own will.It is very possible for your current setup to have some deep links that you are dealing with, and maybe you have some of the destinations inside the nav graph builder to be different than
composable<T>, like navigation<T>, dialog<T>, bottomSheet<T>, etc. To learn about migrating all of these, how to work with scenes and scene configurations, conditional navigation, deeplinks, predictive back navigation, scoping, but also about other topics like recomposition, stability, and modifiers make sure to join the Advanced Compose course.